and all of the shortcuts available, too!
Hello again! 👋 Well, Figma did it again. The team solved and shipped a feature — actually, kind of a whole new way of working within the canvas — to help address a problem I didn’t even know I had. It’s called multi-edit, and even though I’ve only been using it for a short amount of time, it’s already one of those features that feels so natural and native to the tool and once more highlights the talent of the Figma team.
Within this newsletter edition, I’d love to tell you more about the feature, where it’s helped me the most, and all the shortcuts and tips I’ve learned for making the most of multi-edit. I already can’t help but wonder how many mouse miles and clicks I’ve saved.
Figma Focus: Multi-edit

Multi-edit is a feature now available within Figma and allows for, as the name suggests, multiple things to be edited simultaneously. It’s one of those rare features in software design that makes you feel like, at least for a brief moment, you’ve just gained a new superpower, and I promise that once you try it, you’ll wonder how you ever designed without it.
Figma’s Multi-edit reminded me of a moment when I was first getting started within design. I’m no developer, but at the time, I was exploring and learning how to code up a website using HTML and CSS and editing the files when I noticed I had made a typo several times throughout the file. I had misspelled a URL that appeared in several spots, and although a little tedious, it seemed easy enough to click and edit, click and edit. That was until an engineering friend suggested that I use the feature which let me insert multiple cursors within the editor, so that any keystroke I made would render at each cursor location. It felt like I had five or six developers all suddenly pop in to help me in the file, and I could now fix all of the typos in just a few seconds.
Although rare, these moments are what I love most about interface and interaction design. Even after decades of building software, we as designers and developers are still occasionally able to discover opportunities through observing how people use the tool or service and can build simple and elegant solutions for either the long-existing problems or the experiences we weren’t aware could be improved.
Multi-edit is one of those features.
All About Multi-edit
Although Figma has always provided us with ways to select objects within the canvas, it wasn’t always easy to actually make that selection. The ability to edit those objects was also limited and often required a certain amount of structure to be in place.
For example, we could use components to adjust an interface element in multiple places at once, but using components isn’t always practical in the earliest phases of exploratory design. Auto layout lets us easily add, align, and move objects within a frame, but structure is again necessary and may not always mean making those changes in multiple places at once. And while it’s possible to select all objects that share properties by way of the quick actions menu (with an object selected, tap CMD ⌘ (CTRL on Windows) + / and then type “select all…”), there wasn't much editing that was possible once we did have the intended objects selected.
With the new multi-edit capability, we can now easily select matching layers or objects within Figma and make any necessary adjustments, such as modifying alignment, rotation, text, or scale. It’s an incredibly powerful and efficient way of working, and I’m especially excited about the ability to have multi-edit variants included, too! If you often prototype and use smart animate, multi-edit is also a tool that makes for easier changes to those common and persistent properties within a design.
Let’s talk about how to use all that’s new.
Using Multi-edit
Identifying Matching Objects
Multi-edit uses a new term called matching objects, and I have a feeling I’ll be typing that word a lot within this post! Matching objects are layers that match in naming, such as “Frame 1” or “Label”, and these layers can be anything from frames, groups, shapes, text, and more.
To have a matching object available, it needs to be within a frame or group, meaning it can’t be on the canvas by itself, and it needs to appear within more than one spot within a file’s page. Matching objects can differ in size and appearance, and if either a frame or a group, their nested content doesn’t need to match — only the name of the parent-level layer must.
To identify if and where matching objects exist within a design, with an object selected that appears again elsewhere within the page, hold the Shift ⇧ key. You’ll then notice that Figma places a blue highlight around all objects that match and are available for selection. It’s not necessary to identify matching objects before selecting them, but I’ve found that doing so can help to ensure the right matching object is identified.
All that said, what’s important to remember as you begin to use this feature is that it’s not necessary to select all matching objects to see many of the benefits of the new mechanics! Even if two objects that aren’t precisely matching are selected, it’s still possible to work with and adjust them in new and more convenient ways than before, which I think is the best part of this entire release.
Selecting Matching Objects
With an object selected, there are three interactions within Figma to select all matching objects. Our reason for selecting multiple matching objects is to modify their properties simultaneously, which I’ll share more about in the next section, and it feels like absolute magic within the tool.
Note: All matching objects within the page are selected, even if those objects are outside your current zoom level. Matching objects that appear on other pages within the file are not selected, which follows typical file and page conventions. A fantastic level of detail and craft here is the included markers, which show near the edge of the canvas to help highlight that there are objects selected that are out of view.
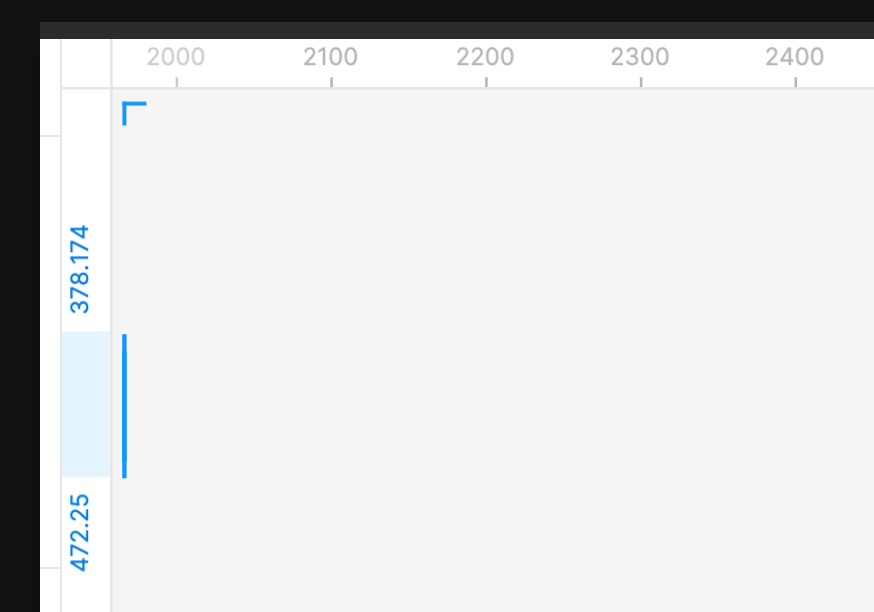
1. With the first object selected, navigate to the top toolbar and select the new select all matching layers button. If this button isn’t shown, double-check to ensure your object is placed within a frame or group and not alone on the canvas. If matching objects exist, they’ll be selected; if not, Figma will notify you that no matching layers were found.
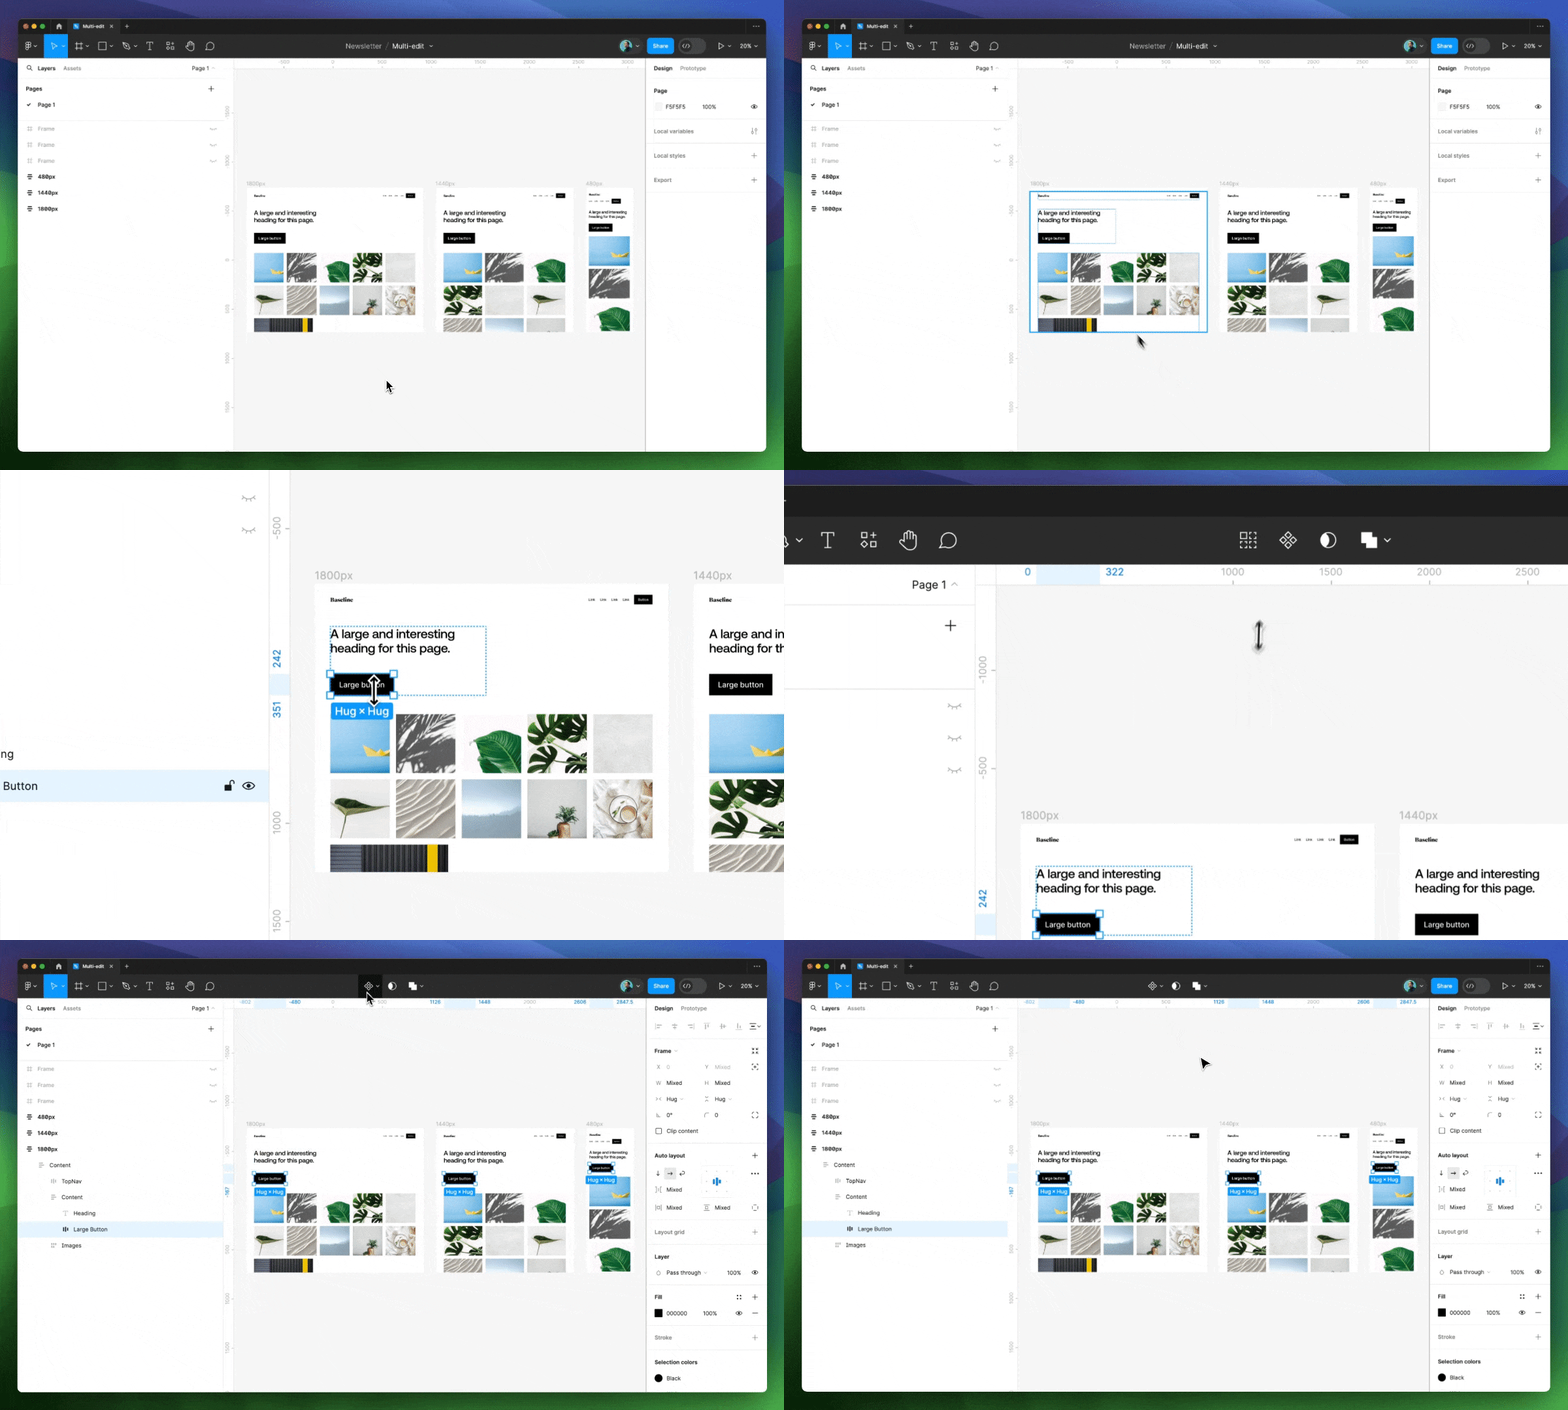
2. The second method for selecting matching objects is to use the keyboard shortcut for the above method, which is CMD ⌘ + OPT ⌥ + A (just like the regular CMD ⌘ + A shortcut, only with an extra modifier key attached.)
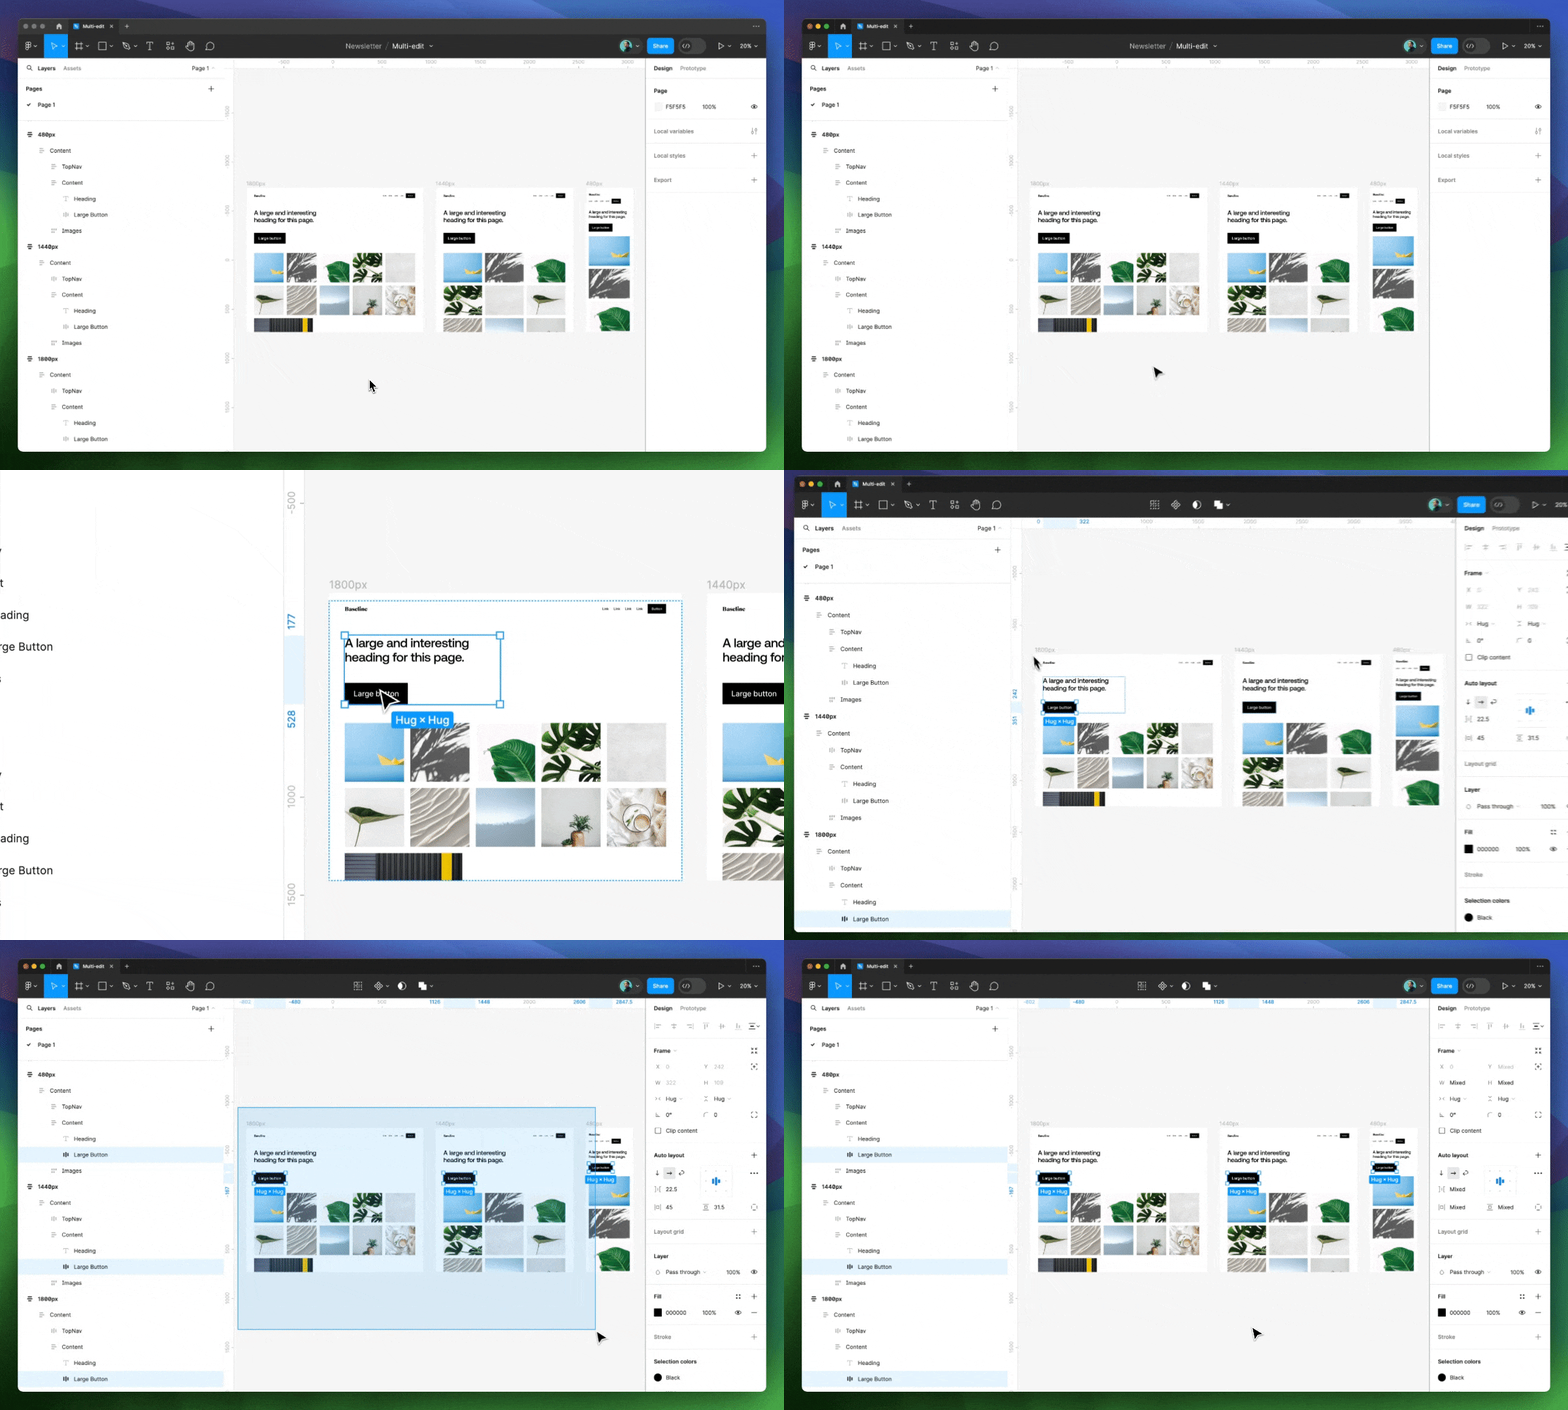
3. The third and maybe most interesting method is to hold the Shift ⇧ key and begin dragging from outside of the frame inward so that the original object and all matching objects are then selected. Note: If you start by dragging within a frame, Figma assumes that you may be attempting to add objects to your selection, and matching objects will not be selected.
Editing Matching Objects: The Basics
Scale
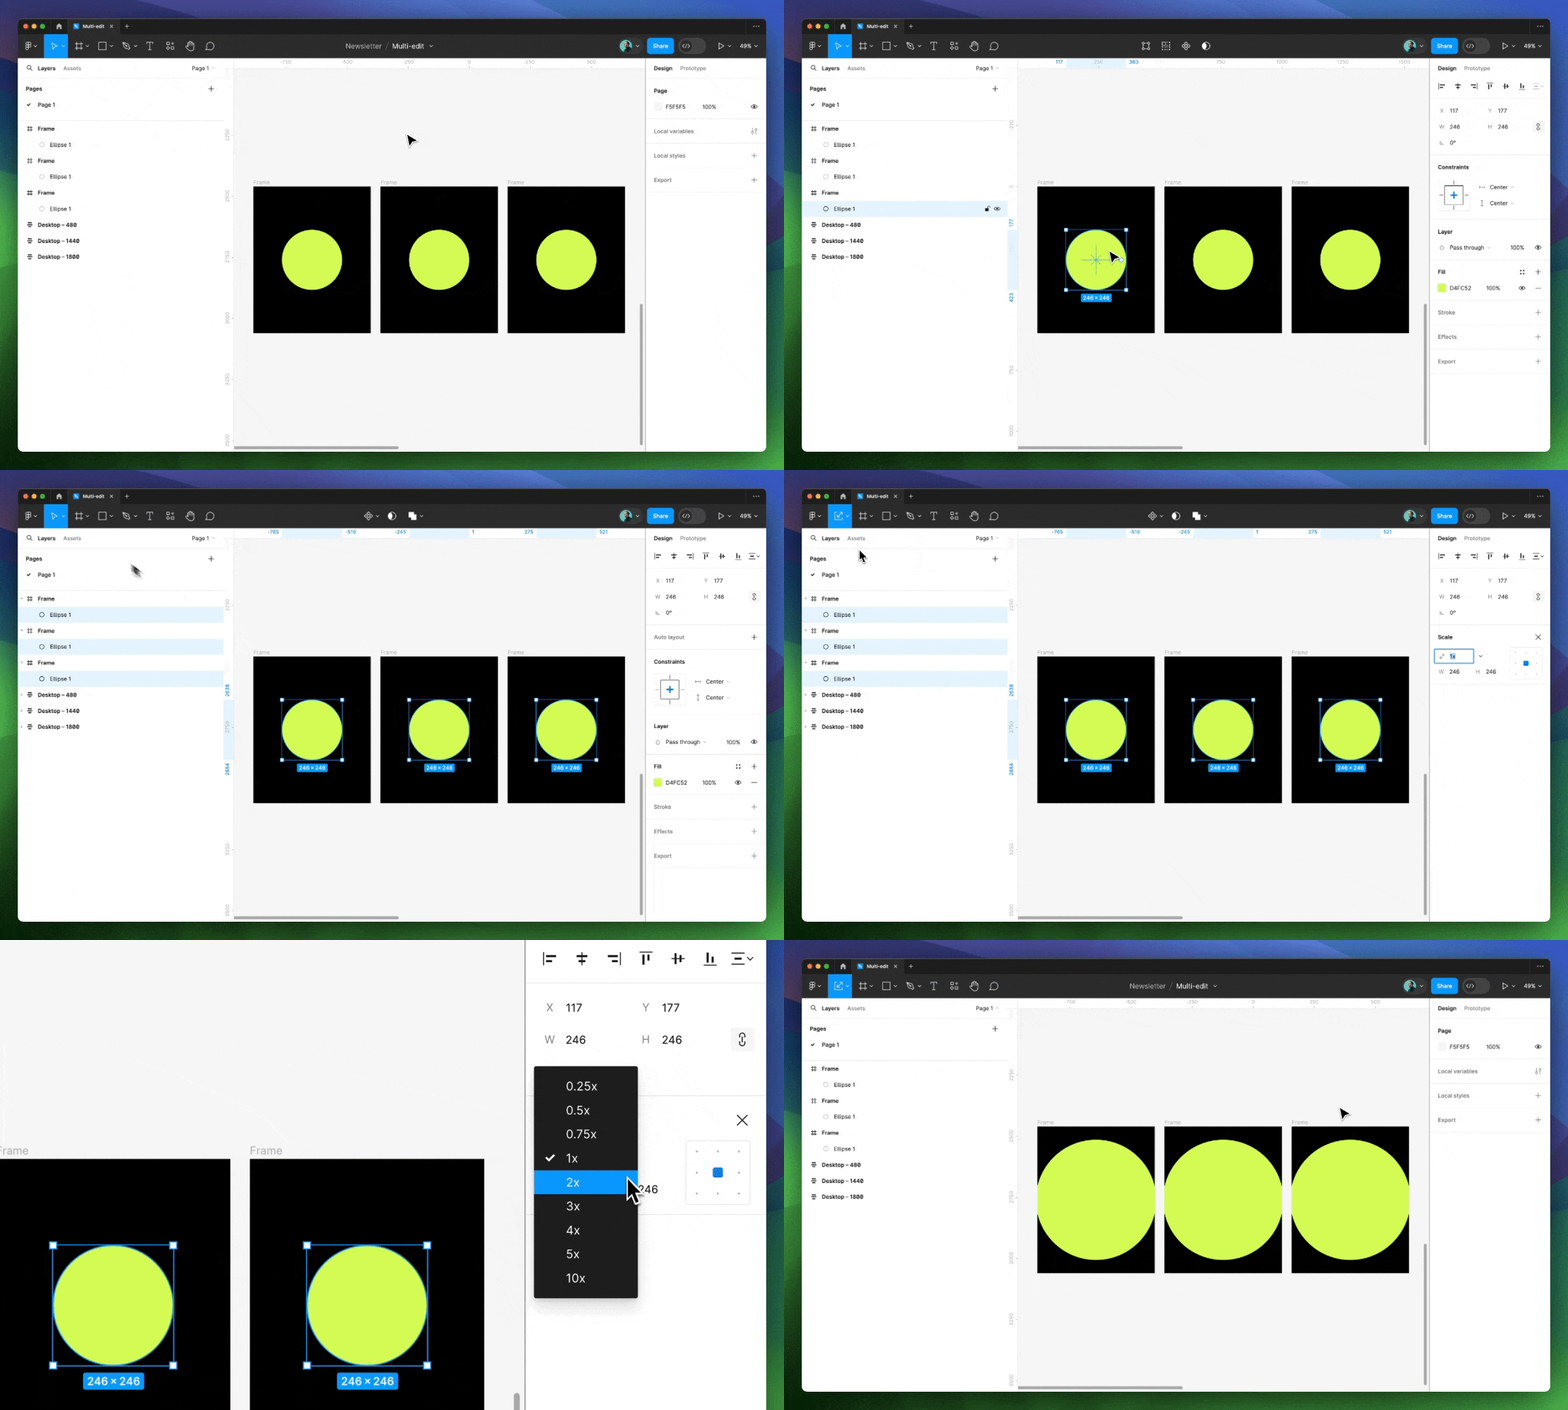
If selecting matching objects is the first step, making edits to them would naturally be the next. Before multi-edit, it was possible to edit a selection of layers (matching or otherwise), only the adjustments were not relative to the frame but rather the selection as a whole. This meant that for scale adjustments, the ending position of objects would become incorrect, and it was often more efficient to scale one at a time. With these most recent updates, selected matching objects scale relative to their frame, letting them maintain their original positioning.
Alignment
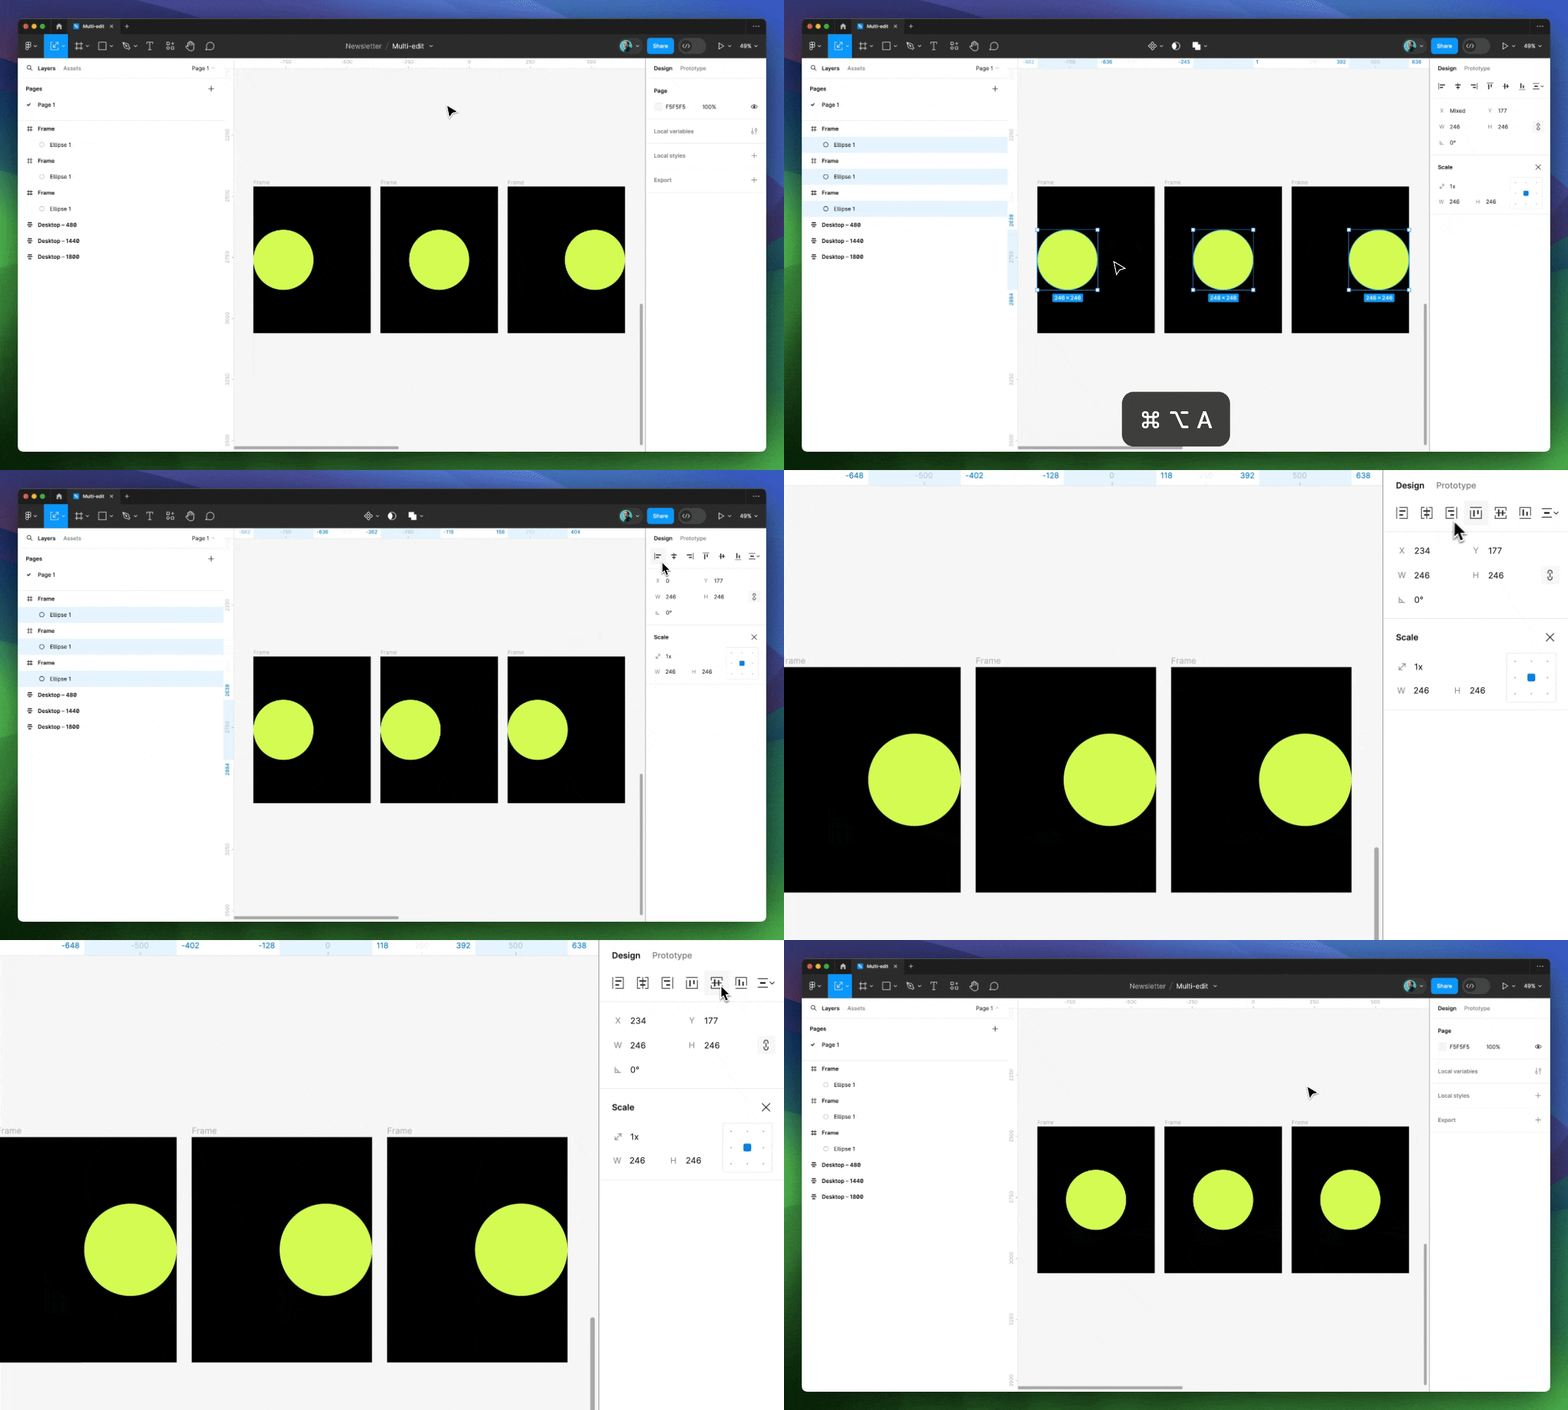
Before multi-edit’s new capabilities were introduced, it was common to align multiple selected objects only to have them accidentally stacked on top of one another. With the improvements made from multi-edit, objects can now be aligned to their respective frames — not just one another. Woohoo!
Having this option now available has already proven helpful in my workflows, as I can now select multiple matching layers and adjust their positioning and alignment for the screen they’re in rather than to the selection as a whole, which was rarely my intention. To align selected objects relative to the frame they’re in, hold the Shift ⇧ key when hovering over the alignment controls.
Transformations
When editing a group of matching object’s rotation, scale, or position, it’s common for their starting values to differ from one another. Because of this, Figma allows for each transformation edit to be either absolute or relative to the objects.
For example, if I had a top navigation bar and wanted to ensure it was seated at (0,0) on the canvas, I could set “0” for the value in both the X and Y input. Each top navigation bar would now start at (0,0), regardless of their starting position.
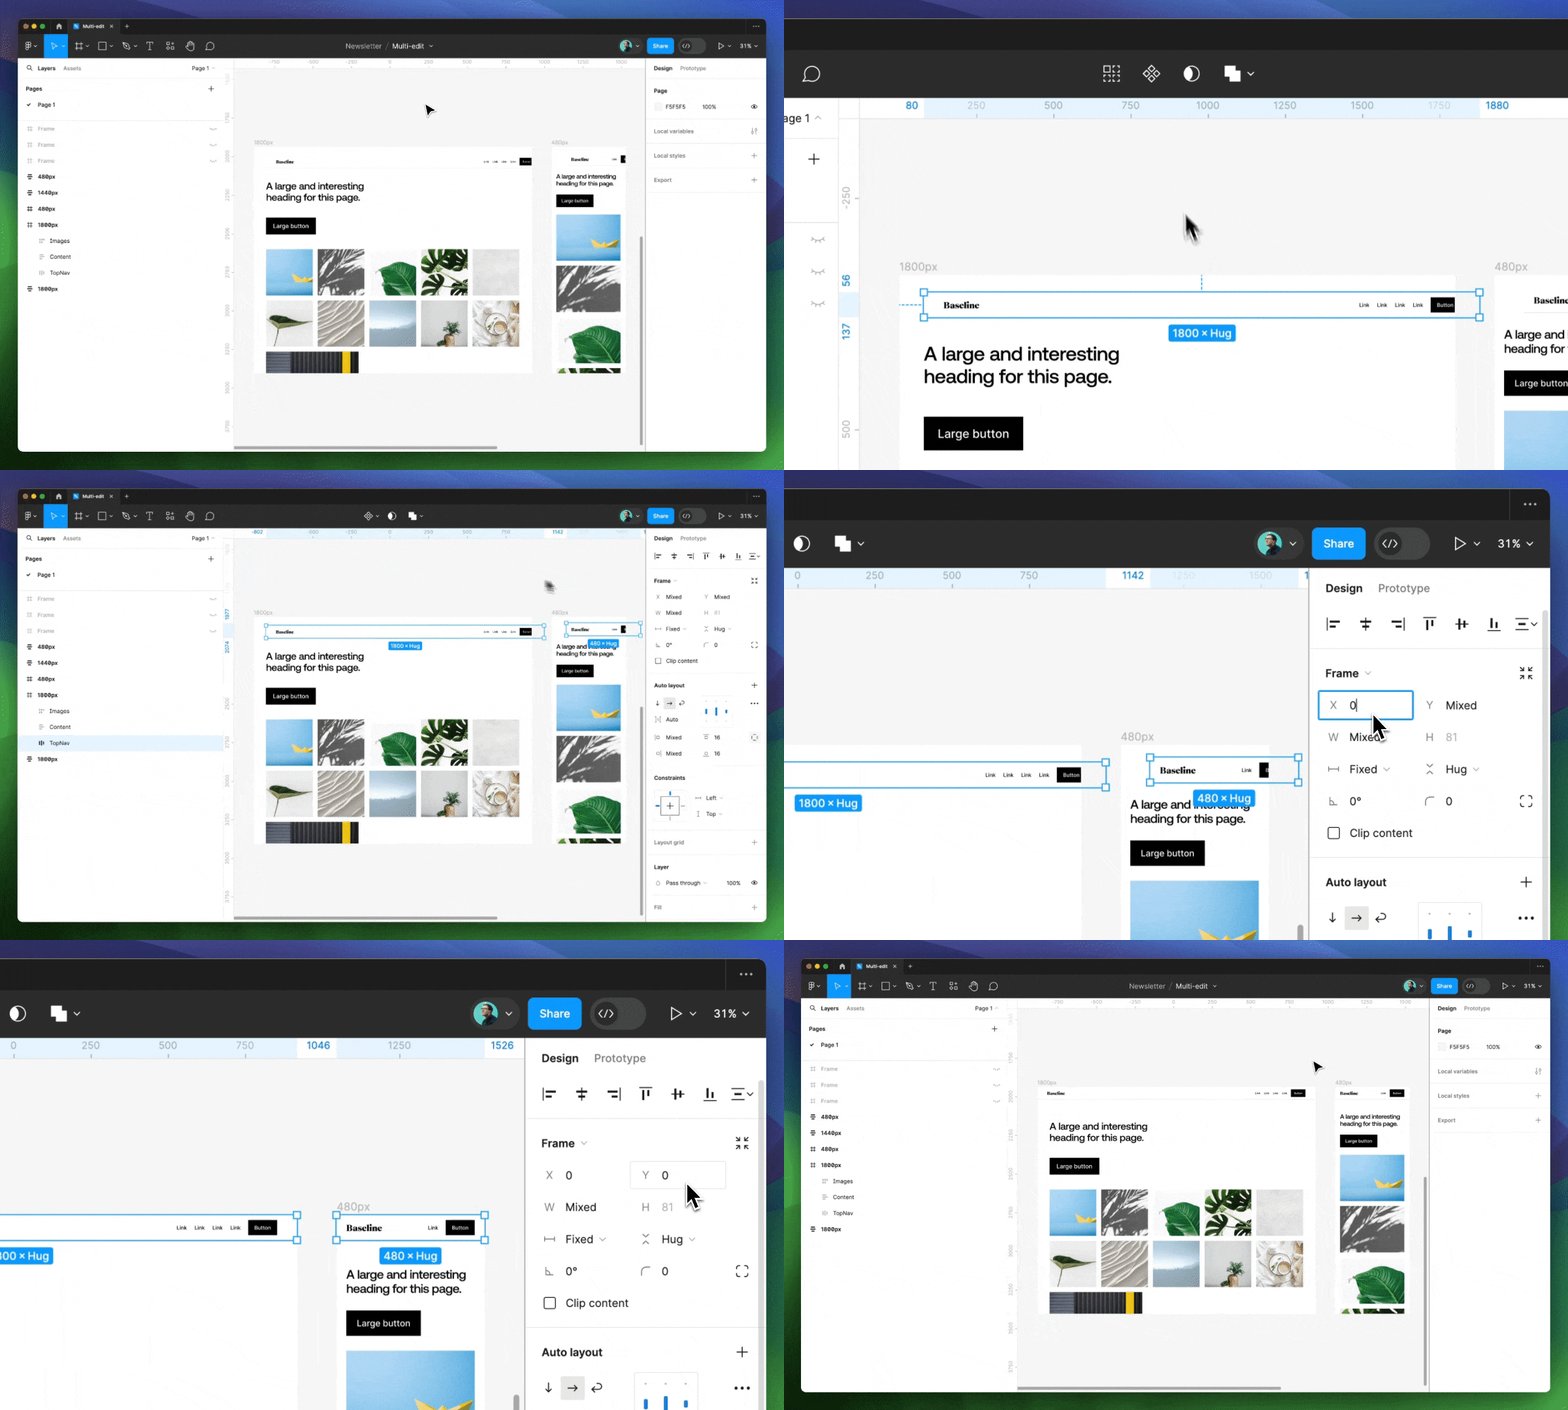
Alternatively, if I had two buttons that differed in size and wanted to increase each width by 24px, I could apply a calculation within the input, which would read out as Mixed + 24. Each button in my selection would now update by 24px and would retain varying widths.
Re-parenting Nested Frames
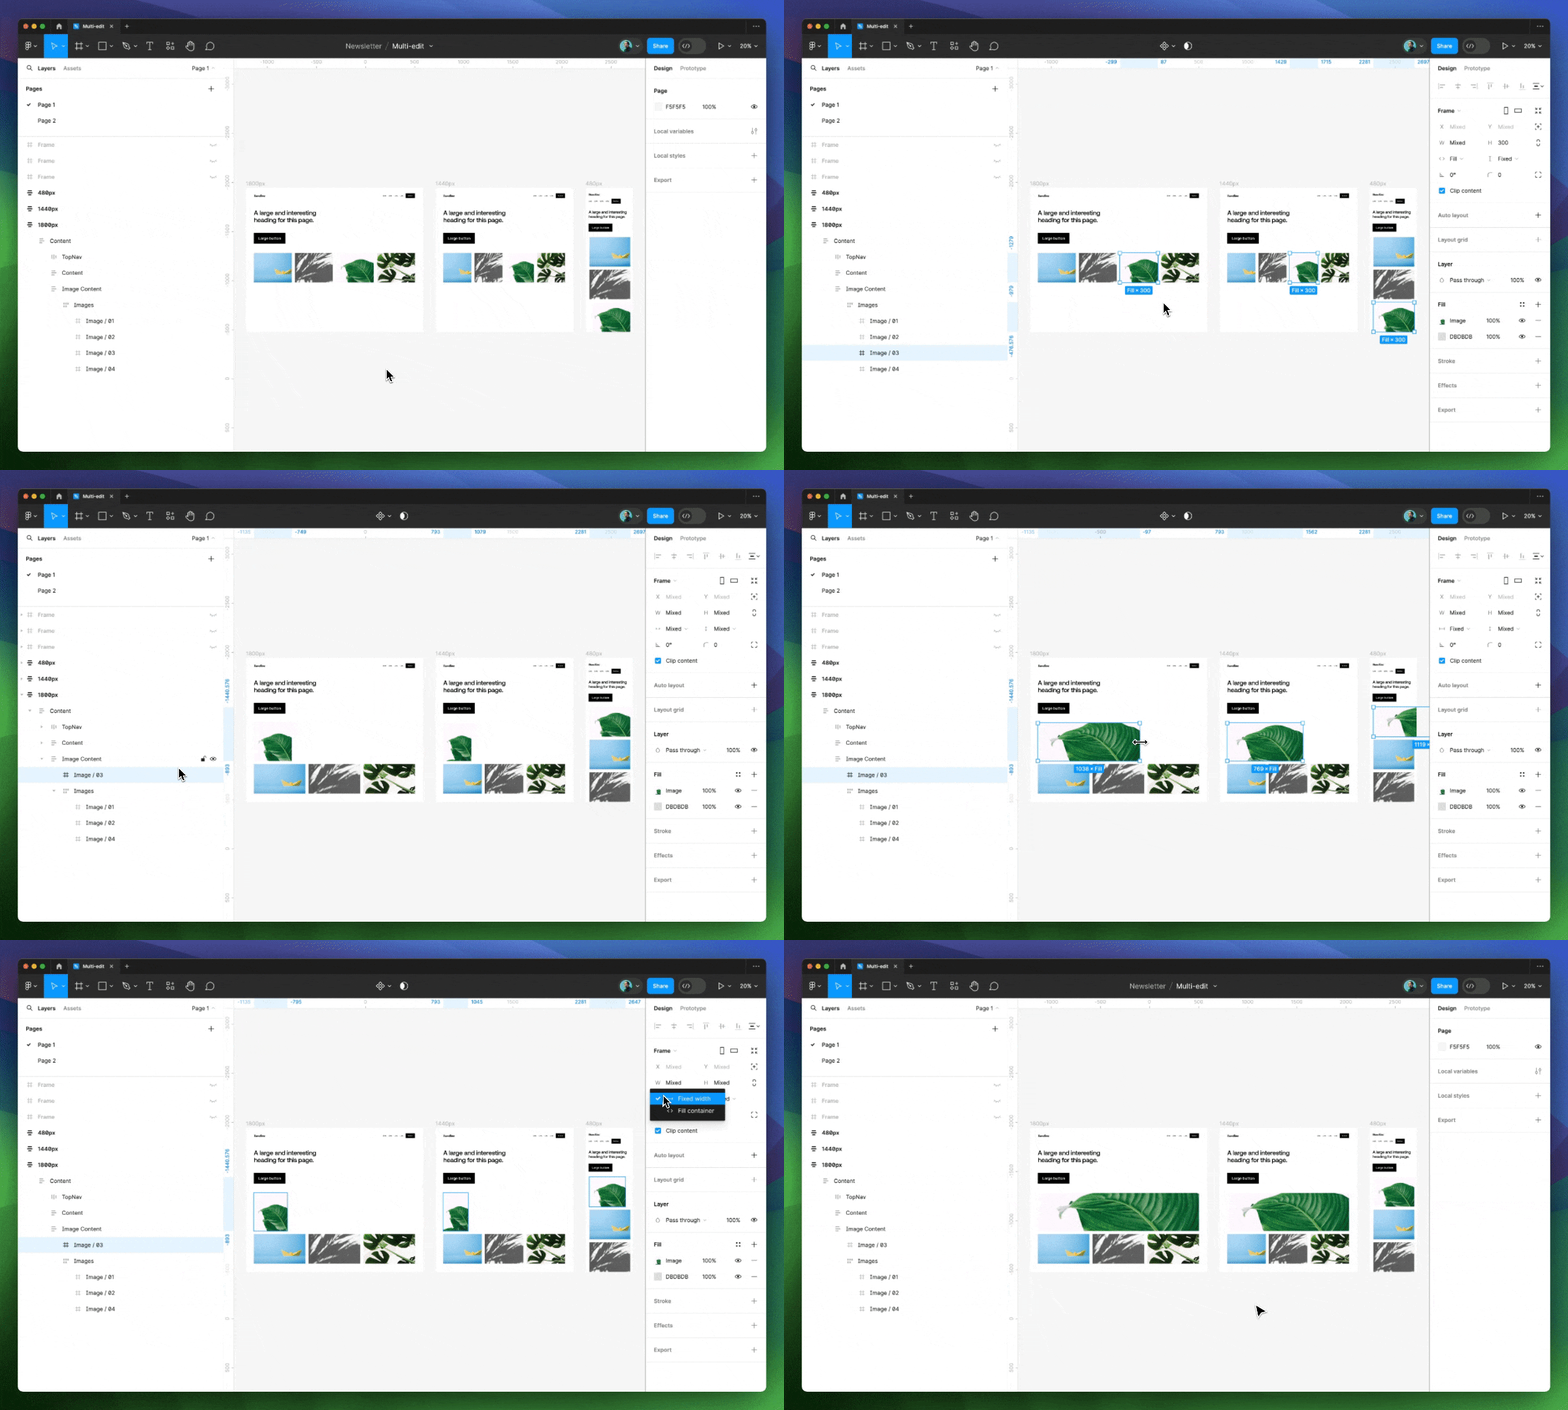
Sometimes in Figma, you just need to experiment and break the existing structure. With multi-edit, selected matching objects can now be moved in and out of both frames and groups, which would have previously required a lot of repetitive clicking and dragging.
Copy & Paste
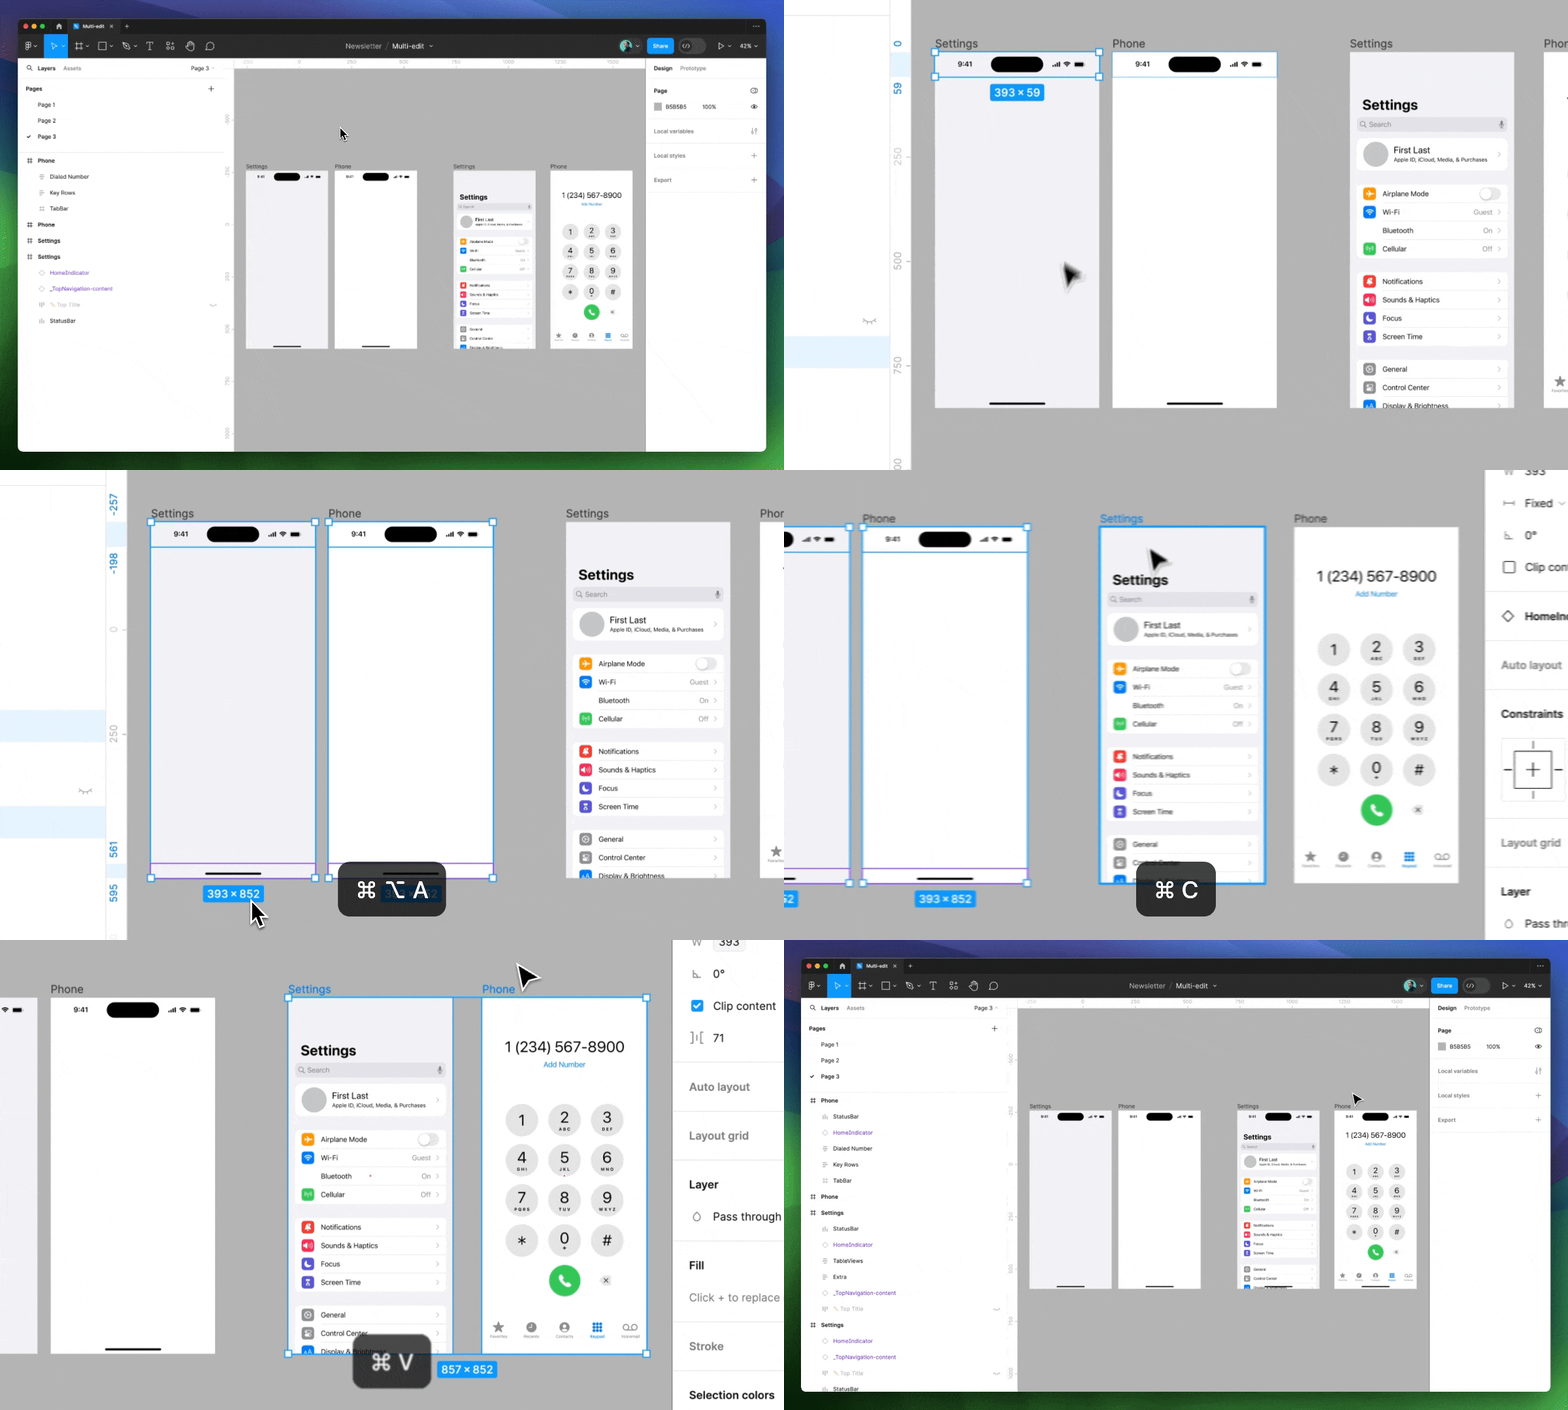
In its history, Figma hasn’t been shy about the need to improve how copying and pasting within the tool has worked, and the team made a few substantial changes just a few years ago. It’s gone from confusing to use to nearly perfect within just a few releases, and with the multi-edit update, copy and paste has become even better. Objects copied from a series of frames can now be pasted directly and respectively into a matching series of frames, all while retaining their original positioning. Another win for copy and paste!
Editing Matching Objects: The Advanced Features
Multi-edit Text
Before the release of multi-edit, changing the content of text that appeared in multiple places at once was challenging, but there were a few ways it could be done. Components and instances could be used, text variables could be created and applied, or the updated text string could be copied to the clipboard and using a combination of the quick action menu’s “Select all with…” and paste to replace was a solution, though not a great (or very well known) one. Each method required a predefined structure or a bit of manual and tedious clicking and selecting throughout the canvas. Fortunately, Figma recognized this limitation, and one of multi-edit’s many superpowers is its ability to help designers and content designers edit text across multiple matching text fields.
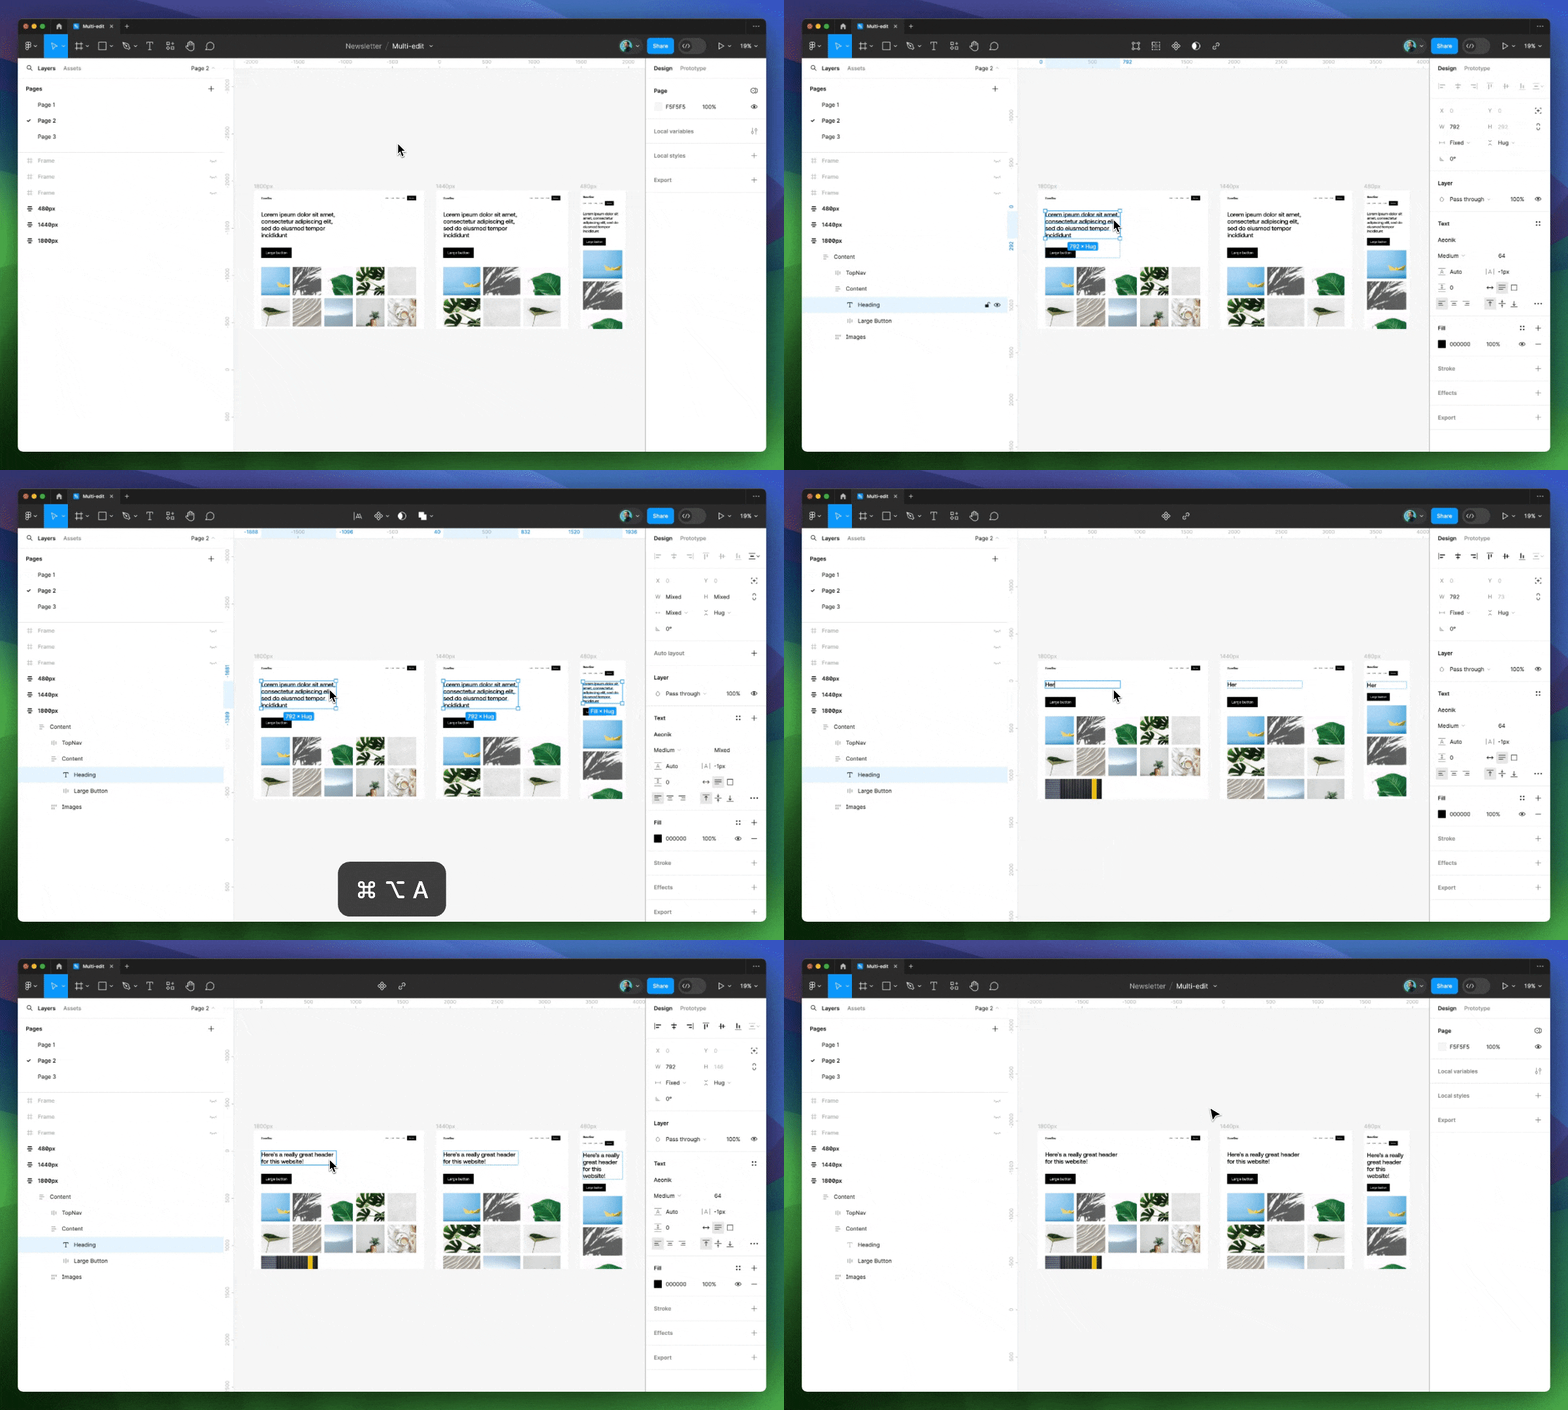
To use this new feature, first select a text object and then select all matching objects. Remember, the actual text content can be different; all that’s required is for the names of the text layers to match, which is generally good practice if you’re working with components, as this helps preserve any overrides made within the instance. Next, select the new multi-edit text icon within the top toolbar, or tap enter and begin typing! All layers will now instantly update to reflect any typed changes. Additionally, with all those matching text layers selected, existing or new text styles can be applied or created, and text properties such as line height can be adjusted, too.
Multi-edit with Auto Layout
Of all the editing adjustments, this one has to be my favorite.
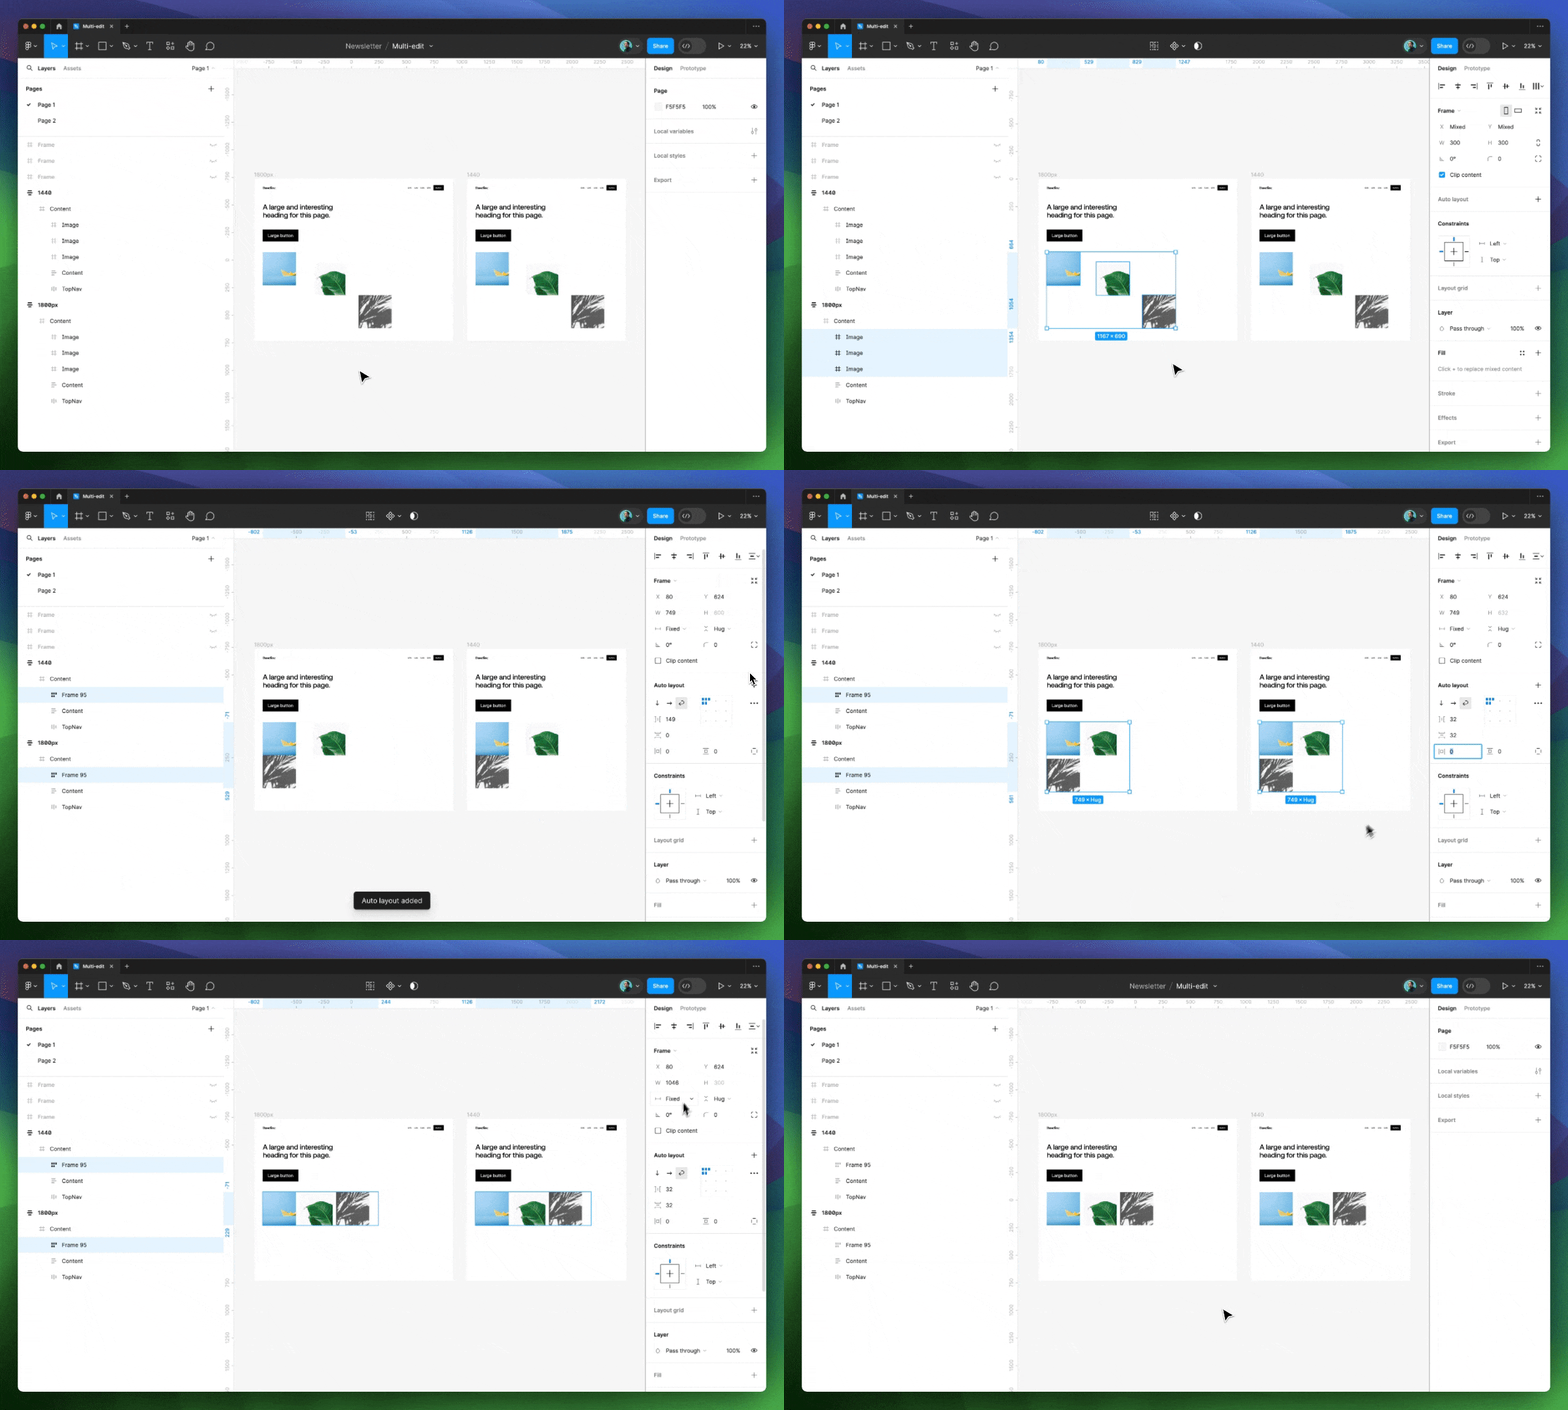
Imagine having several objects within various designs, such as images, and wanting to apply auto layout wrap to organize them within a grid. Before, with those images selected, applying auto layout would have created a large, single frame with auto layout applied, which was rarely the desired outcome. Now, with multi-edit, auto layout can be applied to each cluster of images with just a tap or by using the Shift ⇧ + A keyboard shortcut.
If any ordering or visibility adjustments need to be made to one object across designs within an auto layout frame, we can now select that object, and then, with all matching objects selected, actions such as hiding or adjusting the order can occur. What’s extra impressive here is that the multi-edit selection can locate matching objects within the design, regardless of the parent frame’s ordering and direction settings.
Multi-edit Components
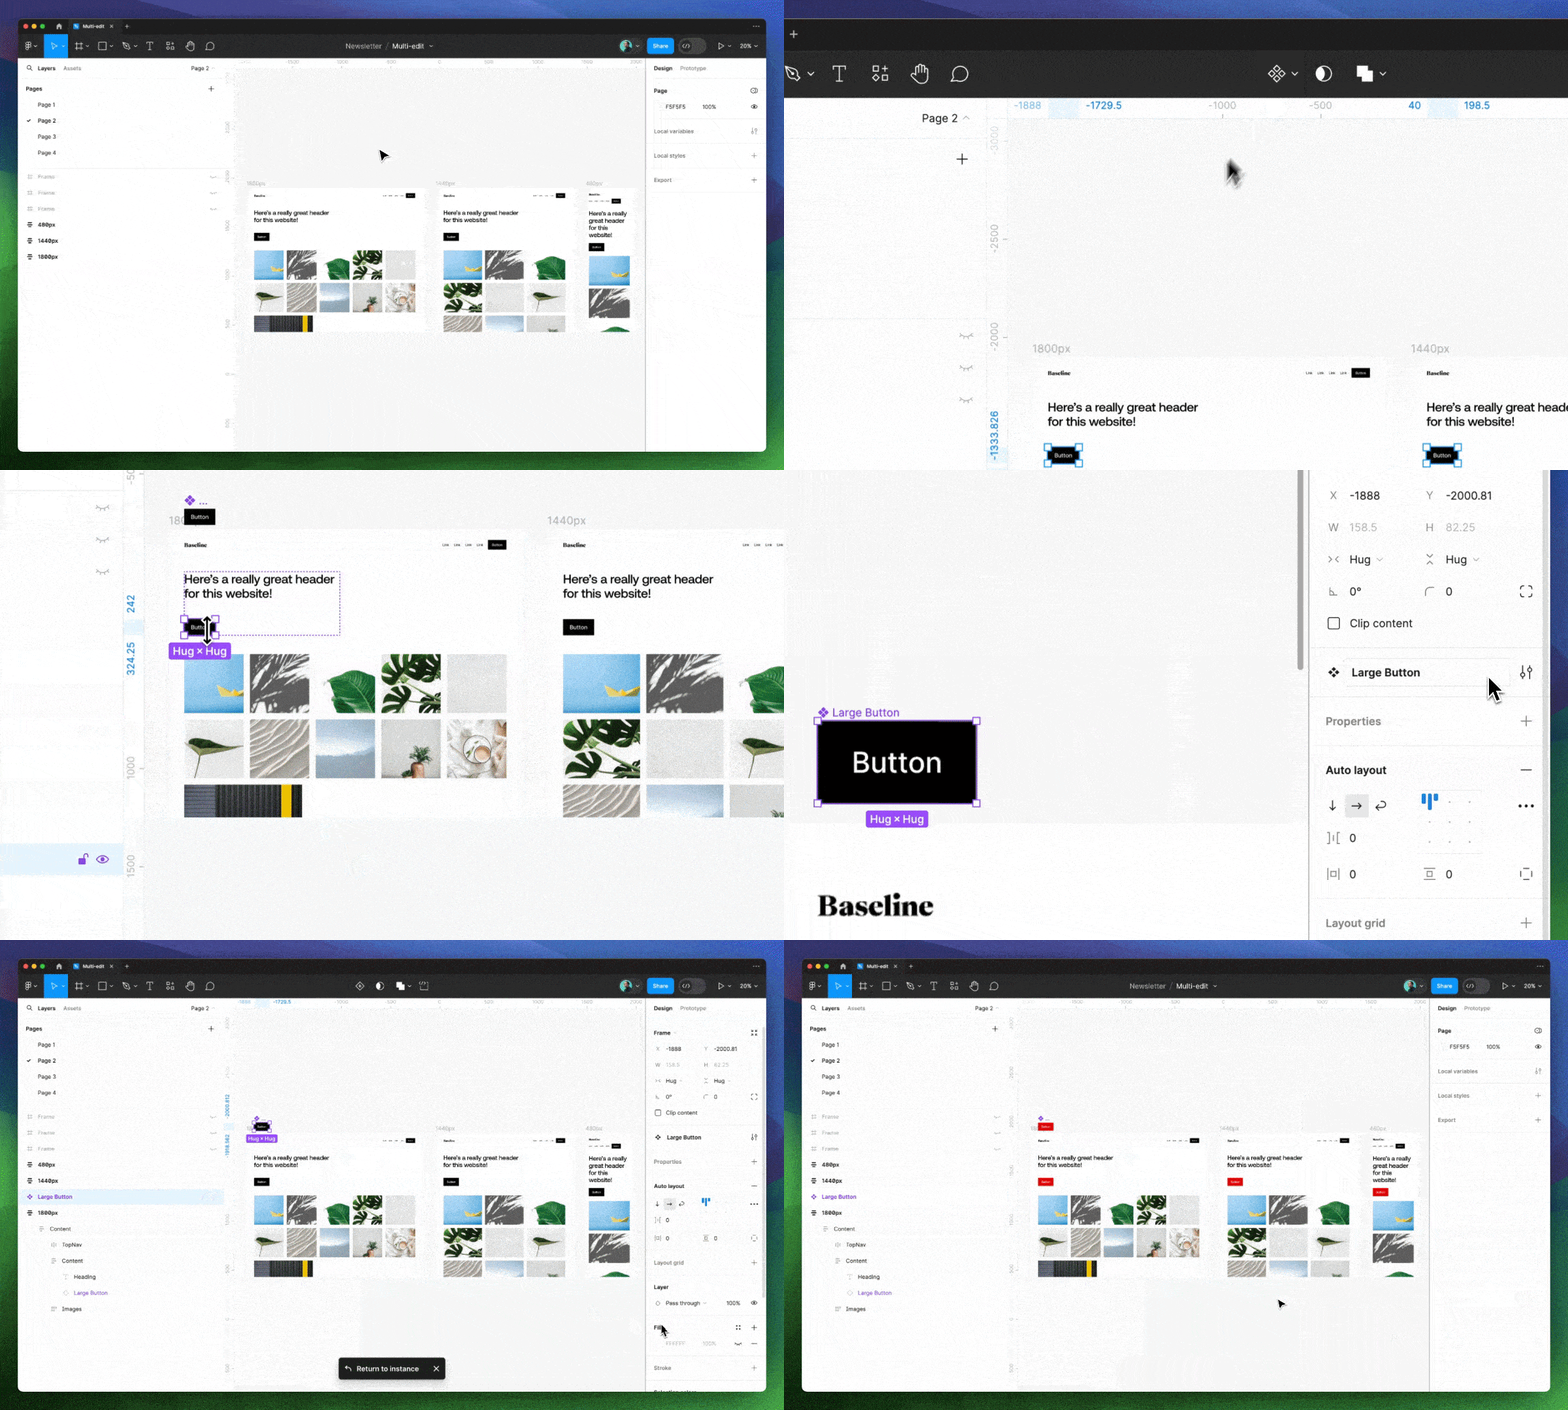
I thought something like this would be too complex to implement, but multi-edit came with a huge surprise: the ability to select matching objects and swap them for instances of a new component. It’s always a challenge to go from the exploratory phase, where non-componentized objects exist throughout designs, to beginning to build the library to support it all. I have to imagine this feature alone will help so many designers out there.
This works by first selecting the object that is ready to be turned into a component for use throughout the file. Now, select any matching objects. All that’s left to do is create a new component, either by right-clicking and using the menu or by using the CMD ⌘ + OPT ⌥ + K keyboard shortcut. Figma automatically swaps each selection out for an instance of the newly created main component located just above the design.
Note: At least at the time of writing this, it’s not yet possible for differences in content to be preserved, even if the layer names are identical. For example, if two matching buttons are selected, but one says Contact Us and the other says About Us, even with both layers named “label,” Figma references and uses the left-most selected item on the canvas. I’d love to see the tool shift this behavior to use the first selected object **instead when creating the component.
Multi-edit Variants
For designers who are often creating and working with component sets, there’s one last feature that multi-edit supports: the ability to multi-edit variants. When component properties first launched, Figma included the option to select all matching elements across variants within a component group. This feature made it super easy to adjust the selected item’s properties, such as its ordering within an auto layout frame, or to toggle its visibility. It’s a helpful selection utility, and I never questioned how Figma could improve it, but of course, with multi-edit, the team found a way.
Now, when editing a variant, we have the option to enter a new multi-edit variant “mode,” as it remains enabled until either clicking elsewhere on the canvas or by toggling the shortcut key Q (be careful not to accidentally tap ⌘ + Q, though!) When this new multi-edit variant mode is on, any change made to one of the variants, such as adjusting text, adding an icon, or changing size, is applied to all variants within that component group. For example, this means that if there’s an icon that’s to be placed within each variant, it’s no longer necessary to copy and paste that icon several times for each variant, as it’s now possible to either paste or bring that icon in directly from the assets panel into just one of the variants.
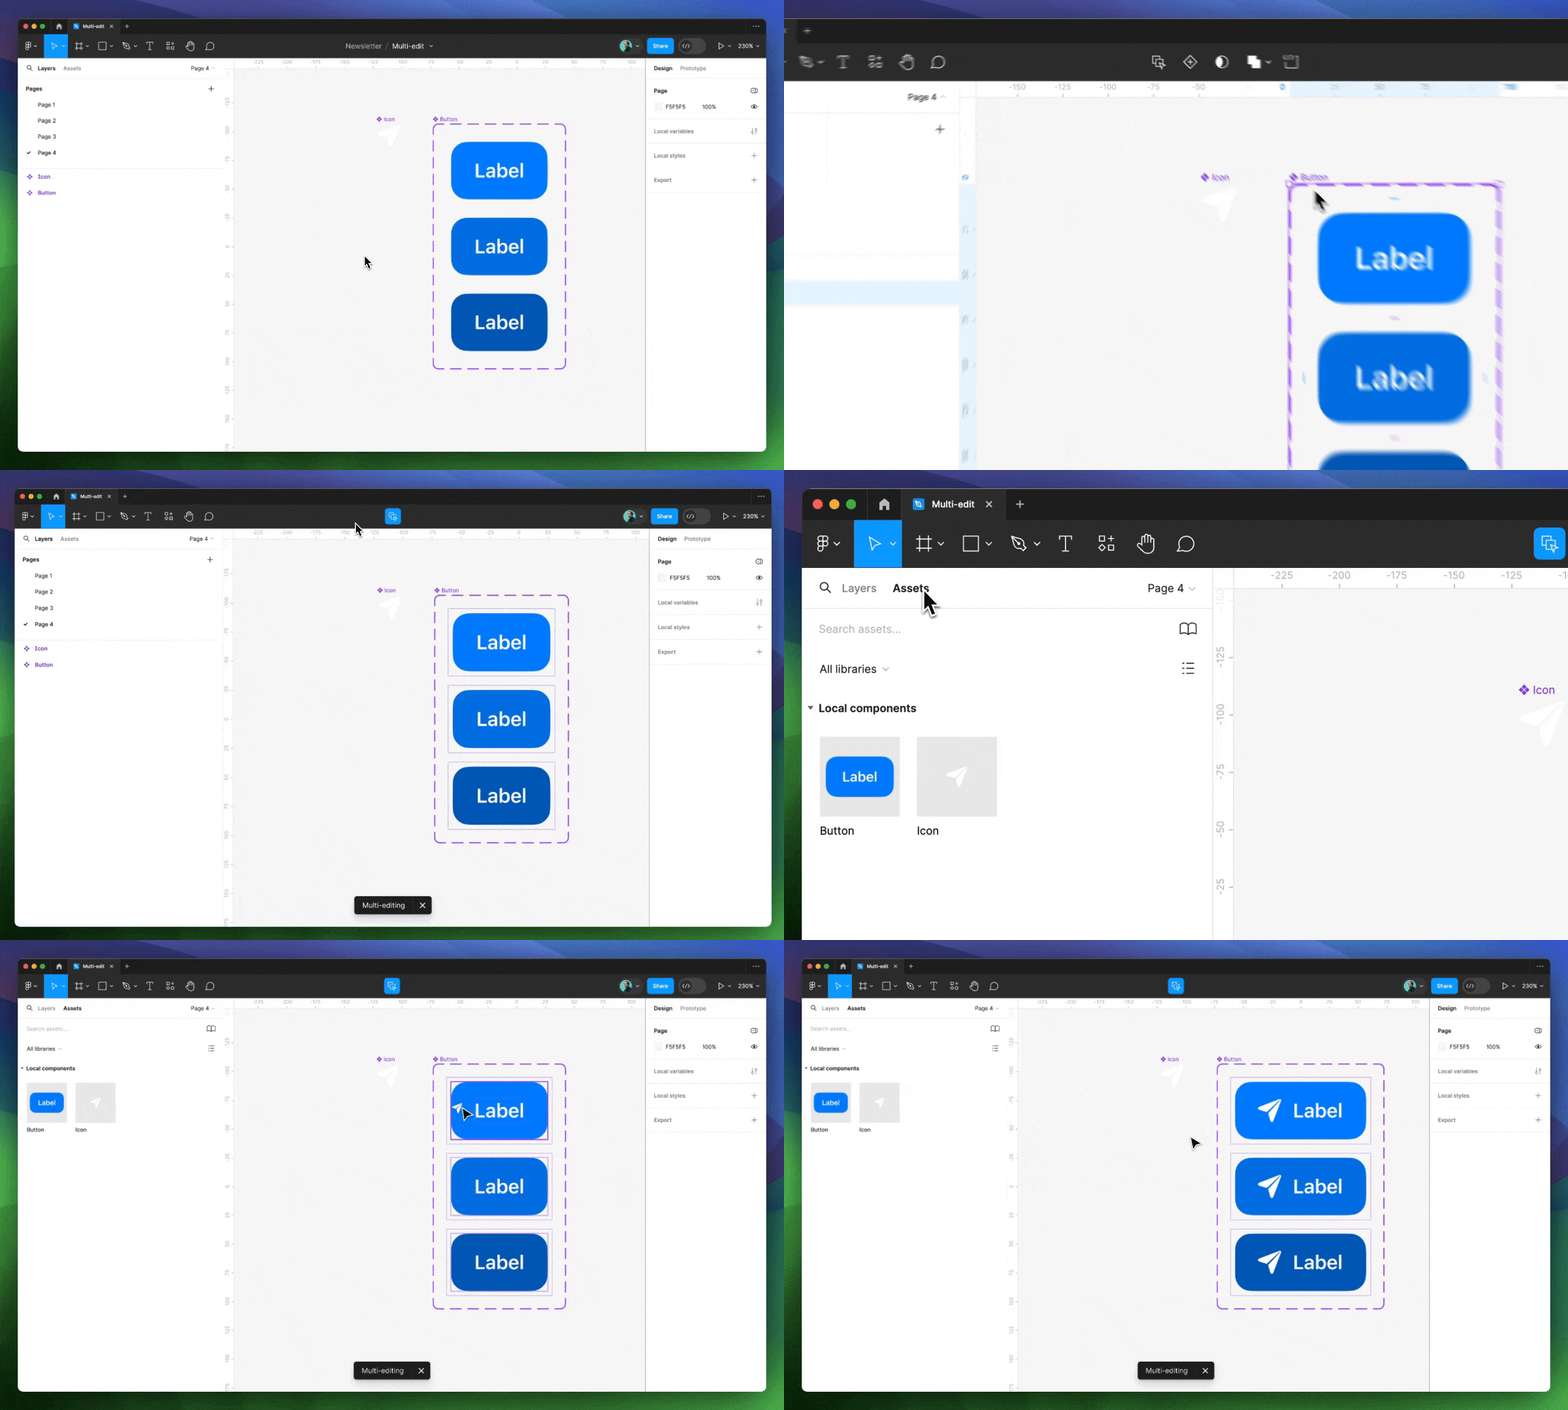
There may be times when the object to be included within all variants isn’t yet available within the assets panel, and it’s not on the clipboard but instead exists on the canvas. If you enter the new multi-edit variant mode and select that object, Figma will assume you no longer want to be multi-editing. At least at the moment, I’m not sure that this is the best behavior, as I expected to stay within the mode, but I’d love to give it more time. The trick I’ve found to make this a little easier is to bring the object into the first variant cut it, then enter multi-edit mode and paste it.
All the Shortcuts
I love using shortcuts, and I sincerely hope that by the time (if) I retire, I’ll have saved enough time using shortcuts to regain a full day of my life. As expected, there are several helpful shortcuts Figma included as a part of the multi-edit feature, all listed below.
- With the first object selected, use
CMD ⌘ + Opt ⌥ + Ato select matching objects. - With the first object selected, begin dragging outside of a frame while holding
Shift ⇧to select matching objects. - To edit the content of several matching text layers, select all matching objects, tap
enter ↩️, and begin typing. - When working within a component set, toggle
Qto turn on or off multi-edit for variants.
Closing Thoughts
I’m so happy that multi-edit has arrived. Within my daily work, the feature has already proven its value for the largest adjustments and edits, as well as the smaller ones, such as quickly deleting multiple objects.
With any new feature, I’m curious to see how others will begin to use it and how Figma iterates with time. A few items have already surfaced in my personal wishlist, including the ability to see how many matching objects will be selected before selecting them.
Phew! Thanks so much for reading, and I hope this post gives you all you need to begin playing around and experimenting with using multi-edit in your work.
In case you missed it…

For anyone wanting to become more comfortable with any of Figma’s newest features, such as variables, prototyping, auto layout, or the world of design systems and how to structure them within the tool, I’d love to help you in 2023! I offer 1:1 or 1:many training sessions, and I am here to partner with you!
Say hello!
I always love hearing from people, and if you enjoyed this, please reach out! You can find me on Threads @joeyabanks.
